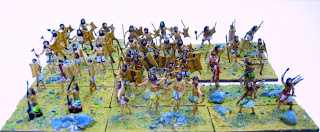
Still only a couple of steps up from the most basic of treatment! I decided to get these finished before my leave ends. Checking over options, I opted to use the 23 foot as follows:
3x3Sp, useful for both Feudal French (b) and Medieval French, as well as being used here and there in other armies;
2x7Hd, though in theory I only need one of those. If I do field something like Feudal French vs Medieval French they will be handy.
Wednesday, August 27, 2014
Medieval Mooks
With the crossbows and Russian foot more or less ready, my next catch-up was a collection of 23 Strelets Medieval foot. I hope they will fill the Horde ranks of armies such as Medieval French. They are all a bit too well-equipped but needs must.
Once again, going for speed rather than beauty, these are only about two rungs above slop'n'go. I washed a dark 'miracle wash' over them so they will look a lot darker than my Feudal English.
The following are just candid snaps with a flash:
Once again, going for speed rather than beauty, these are only about two rungs above slop'n'go. I washed a dark 'miracle wash' over them so they will look a lot darker than my Feudal English.
The following are just candid snaps with a flash:
Thursday, August 21, 2014
Some catch-up work
Spring is in the air, the light is changing, and I'm on leave, so I'm turning my hand to work I got under way a year ago then had to pack away. It's been sitting on shelves in my man-cave.
First up is this HaT half-dozen of Roman Auxiliary Cavalry. They make a good option for both my Impy Romans and Mary Romans. These are professional-looking troops with no glitter, just practical uniform helmets, tunics, shields and mail shirts.
I nearly despaired of getting this much fancier group of Vezda Roman Equites. They are beautiful and deserve better than my skill. Finally a few more touches of paint and suddenly they looked finished. For both sets of cavalry I used the Magic Wash technique to minimise lining-out work. My Marian Roman foot use a black basecoat so they won't look mismatched with those.
The next group are foot, and are seven Strelets crossbowmen (from the box of crossbowmen - a great idea for a troop type that is hard to find in 1:72) and some Medieval Russian foot of various types. The spears will replace the lamest of my existing Medieval Russian spears. With these I used a technique that relies on the varnish deepening colour applied, so for example light green and blue with even lighter highlights, but with no darker colour wash. The varnish itself provides the illusion of deeper colour folds and also lines out borders between areas. It's cheap and cheerful and not a great strain on my limited fitness.
Sunday, December 30, 2012
Later Amorites complete
So with the grouting given an overnight dry, it's time to cover the bases with the usual "desert arable" finish, which is ochre, plus a touch of green to take the burnt look off it, plus PVA (white glue) to ensure anything sprinkled onto it stays there. Again I use the chisel-tip brush to get the paint right around each figure's feet.
A quick sprinkle of grit and medium green flock completes each. Barring the summer grass effect.
Woodland Scenics' grass is something I'm still feeling my way into. I have yet to find an ideal method of applying it. This time, I blob a glob of PVA onto a mix tray then dump a clump of grass on. Slopping the resulting dripping mass onto a base I use a craft knife (a SHARP craft knife!) to slice into the middle of each clump. As the knife slices the grass apart it drives the clump into the grouting, pushing the ends up and leaving a reasonably convincing grassy growth. This will only work with this particular grouting, which stays workable for much more than a day.
After the glue has dried, I use tweezers and sharp knife to separate the strands of grass more. I should try this next time while the glue is still wet. But the advantage of waiting until dry is that the grass can be easily trimmed down to appropriate heights. I do this with small sharp scissors - sewing scissors would be about right.
So here's a summary of what I've achieved:
Added blades:
Added auxilia as 4Ax:
A couple of spare leader types. I think the one on the right will end up in camp and the other may command a chariot:
Here's the army assembled. Psiloi, Hd, and up to 2x3Ax are in common with the Mitanni.
I've now got quite a good cluster of chariot-age rivals.
I/15 Later Amorites: their regular enemies include Hittite OMK, Hyksos, and Mitanni;
I/16 Hittite OMK: their regular enemies include Later Amorite and Mitanni;
I/17 Hyksos: their regular enemies include Later Amorite;
I/19 Mitanni: their regular enemies include Later Amorite and Hittite OMK.
Moreover, the Early Bedouin, in one form or another, also feature in the enemy lists of Later Amorite, Hyksos, and Mitanni.
Saturday, December 29, 2012
Rapid progress on the Later Amorites
So the weather stays cool (and damp) and great for painting. I power through the 2nd coat of white for the kilts, the browns (mid brown first for most of the gear, then the pale brown and dark brown) and flesh highlights once the dreaded eyes are on. Very little of this is needed - I seem to have gotten the wash of flesh colour over white base just right this time. For the latter I fall back on the two lines of brown for each eye - one for the eyebrow one for the eye itself. It's basic but these figures just aren't clear enough to try the full eye again. Then dark brown again for "lining out" the detail, and a few sparse colours for the kilts.
It doesn't take long for them all to dry, and so on to the outer varnish of stain. This protects the mini from almost any damage, and incidentally brings out the detail by providing a natural shade in hollows. Thin it down so that the detail doesn't get smothered, and you have no problems.
Once the minis are all done and dry, it's on to the bases. Trusty coloured (terracotta) latex grouting, smoosh each mini right into it, then use a stiff brush - an artist's chisel-tip brush is best - to "paint" the grout over each base. Then add a few strategic "rocks" from fine gravel, and wait for them to fully dry.
This is the 4Bw General element, after basing but before the base is complete, to demonstrate how the grouting is used to completely cover each mini's base.
Friday, December 28, 2012
Even More Amorites
As those of you that live in this hemisphere know, it's been hot. Too darn hot. The just-right-to-paint light and heat of spring and early summer have gone and the days of high summer are here.
Luckily for my self-esteem, the temperature dropped from Boxing Day and my motivation rose in reverse. I've had nearly 20 more "Later Amorite" foot waiting to be converted from their original Atlantic Egyptian form for... well... a month or so.
This is how army building goes. I buy some elements and make them (Mitanni Chariots) then I hunt around for the rest of the army and make those (the conversions previously covered) and then I look for what can be morphed out of those. In this case it's the obvious: I planned to make "Mitanni" foot from the occupied commoners of the region, mainly Amorites. So by adding some further Amorite elements I get the Later Amorite army.
This is the Later Amorite army list in DBA 2.2:
1xLCh or 4Bw(Gen)
4x3Bd
2x4Ax
2x2Ps
2x3Ax
1x7Hd or 2Ps
Of these, I already have 3x2Ps, 1x7Hd, and 2x3Ax - although it may prove the Ax have to be Bd. So I have to come up with at least 4Bw, 6Bd, and 8Ax figures, with an option for a chariot general figure as well.
Adding the greystuff really took the longest time. This is partly because I've been in two minds about adding armour. I've ended up by deciding that even my Blades will have no armour. So oddly enough the Hd will have the heaviest armour. Unfortunate.
However! I've finally got the greystuff on, added javelins to the Ax, added shields where needed (I carved some shields down from the original, in quite a number of cases.) The base varnish, base white paint and initial flesh are all done. Yay me!
There's a superstition that if you don't finish a project by New Year you are doomed to still have unfinished projects the following year. I wonder if the weather will stay cool enough to finish this army?
Friday, November 23, 2012
Mitanni are ready for action!
Now that I've finally got all the diverse elements of a Mitanni army - six light chariots, two auxilia (with options for being either heavy Maryannu or light Amorite) a horde of Amorites, and three psiloi, the army can now be arrayed:
Subscribe to:
Posts (Atom)


